Are you having trouble charging your Tesla due to the “charge port latch not engaged” error message? Then, you are not alone.
This issue can be frustrating and prevent you from getting the most out of your electric vehicle.
Fortunately, there are several reasons why this error message may appear, and many of them can be easily resolved as you will see in the article.
Whether you have a Tesla model X, model Y, model 3 or model X, the guide covers everything you need to resolve the issue.
First, we’ll take a look at some of the common causes of the issue. Then, I will show you some proven ways to fix it.
Let’s dive right in!
Causes of Tesla Charge Port Latch Not Engaged
The charge port latch is a mechanism that locks the charging cable in place when it is plugged into the vehicle’s charge port. When engaged, the latch prevents the cable from being accidentally pulled out of the port during charging, ensuring a safe and reliable connection.
In Tesla electric vehicles (EVs), the charge port latch is located on the driver’s side of the vehicle, near the rear wheel. To use it, you simply insert the charging cable into the port and wait for the latch to engage. Once engaged, the latch will hold the cable securely in place until the charging session is complete.
The charge port latch can sometimes become disengaged, resulting in a “Charge Port Latch Not Engaged” error message. When that happens, the Tesla fails to charge stops charging. This can happen for a variety of reasons, which include:
1. Obstruction
One of the most common reasons for the ‘not engaged’ issue is an obstruction in the charge port causing a faulty latch mechanism.
This can be caused by debris, dirt, or snow that has accumulated in the port.
2. Environmental Factors
Another common cause of the ‘not engaged’ issue is environmental factors such as extreme temperatures or humidity.
Cold temperatures can cause the latch to freeze, preventing it from engaging properly.
High humidity can also cause the latch to malfunction, so it’s important to keep the port clean and dry.
3. Damaged Latch
If you’re having trouble with the Tesla charge port latch not engaging, it’s possible that the latch is damaged or worn out.
This can happen over time due to regular use or wear and tear. It’s possible that the issue is with the charge cable itself.
It’s also worth noting that some charging cables may not be compatible with your Tesla, which can cause the “charge port latch not engaged” error message to appear.
4. Scheduled Charging
If you have scheduled charging enabled on your Tesla, it can cause the charge port latch to not engage outside of the scheduled charging period.
However, the port latch will be engaged and charging will start as soon as the scheduled charging period is reached.
5. Software Glitches and Bug
A lot of Tesla owners reported that they started experiencing the “port latch not engaged” error message after a software update on their Tesla or the Tesla app.
Consequently, a software update has reportedly fixed the issue for some Tesla owners. In some other cases, a reset fixes the issue.
Tesla Charge Port Latch Not Engaged: How to Fix
If you encounter the “Charge Port Latch Not Engaged” error message on your Tesla vehicle, there are several troubleshooting steps you can take to fix the issue.
1. Check the Charge Cable
The first thing you need to do when your Tesla charge port latch is not engaged is the charge cable.
The error could indicate that the charging cable is not properly connected to the vehicle’s charge port.
First, make sure the charge cable is firmly plugged into the charge port inlet. If it is not, unplug the cable and plug it back in, ensuring that it is securely connected and is all the way in.
Next, you need to inspect the charger cable for any damage or wear, such as frayed wires or broken connectors. If you find any damage, you may need to replace the charger cable.
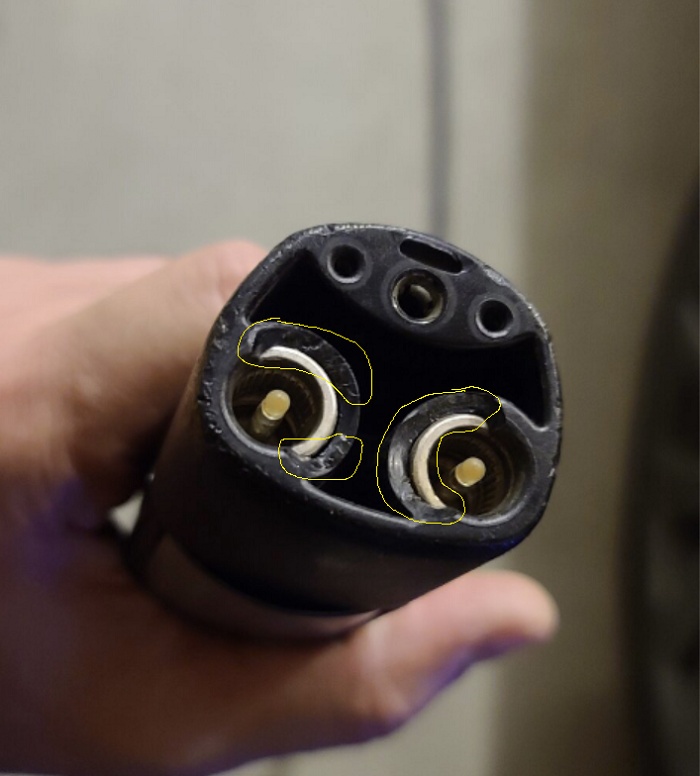
It’s also worth noting that some charging cables may not be compatible with your Tesla, which can cause the “charge port latch not engaged” error message to appear.
Therefore, make sure you are using a charging cable that is compatible with your Tesla model. You can check the compatibility of your charging cable in the owner’s manual or on the Tesla website.
2. Inspect the Charge Port Inlet
The next thing you need to do is inspect the charge port inlet.
You need to check the charge port inlet for any debris or obstructions that may be preventing the charge port latch from engaging.
If you find any debris or any foreign object stuck in the charge port, you need to remove it. You can use also compressed air or a soft cloth to clean the area.
In other cases, the pin in the charge port (or any other part of the latch mechanism) may be broken. In such cases, the latch port may need to be replaced entirely.
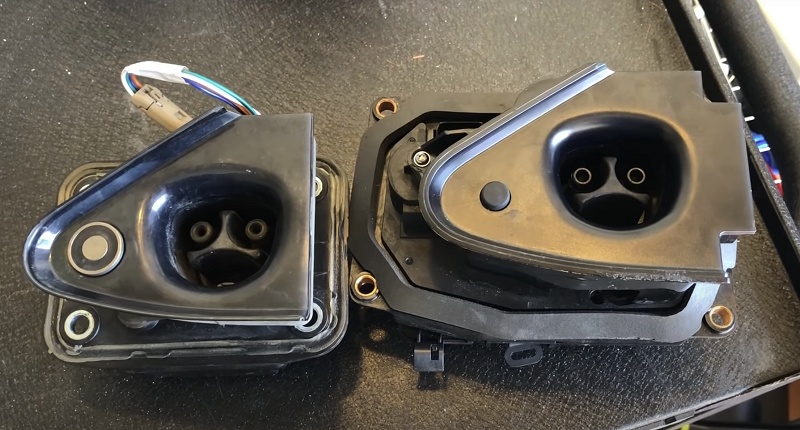
The video below takes you through the whole process (if you have a faulty charge port):
Finally, make sure that the power source you are using is compatible with your Tesla.
While the electric cars can charge from a variety of sources, including the Tesla Wall Connector, a standard 120V household outlet, and a 240V outlet, you may experience issues if the power source you are using is not providing enough power or if it is damaged in some way.
3. Perform a Soft Reset
If there’s no hardware issue with your Tesla charging cable as well as the charging port, then you need to perform a soft reset on your Tesla.
Like I mentioned earlier, the issue is sometimes caused by a software glitch or bug which can be fixed by performing a reset.
Here’s how to reset your Tesla:
- First, remove the charging cable from your Tesla and close the charge port.
- To reset your Tesla, simply press and hold down both scroll wheels on your steering wheel until the touchscreen turns off and the Tesla logo appears. This is called a soft reboot.
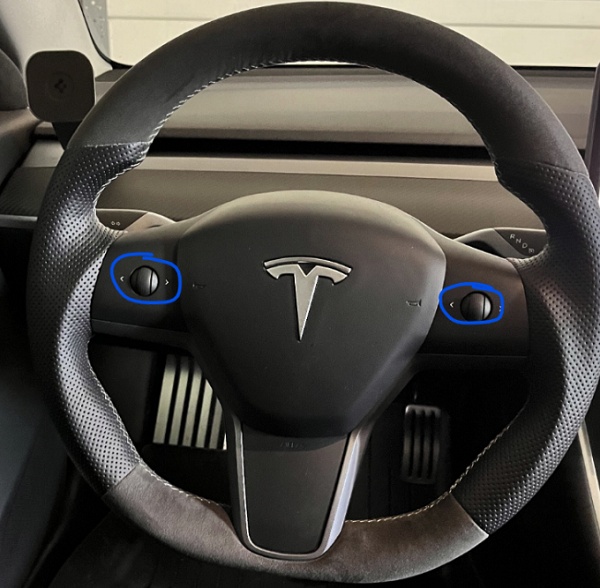
If the issue persists, you can try a hard reboot. Here’s how to do that:
- First, shift into park
- On the center screen, tap on “Controls” > “Safety & Security” > “Power Off”
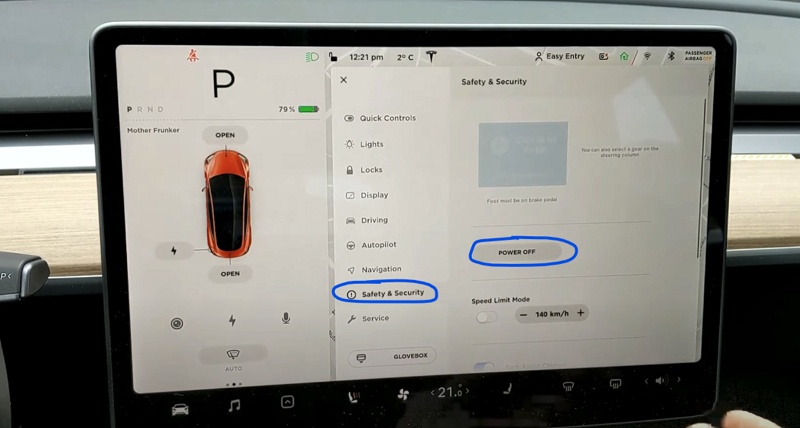
- The screen will turn off and the car will also power off. Then, wait for at least two minutes without interacting with the vehicle (i.e don’t open the door, press any of the pedals or touch the screen while waiting). This is to ensure that the car fully shuts down and that the hard reset is successful.
- After two minutes, press the brake pedal or open the door to wake the vehicle
Once the vehicle is back on, plug the charging cable back into the port and see if the the port latch is now engaged.
If the issue persists, move to the next step.
4. Turn Off Scheduled Charging
The Tesla mobile app is also has the feature to schedule charging. You can also do this directly on your Tesla from the screen.
This feature allows you to set a specific time for your vehicle to begin charging, which can be especially helpful if you have a time-of-use electricity plan or want to ensure your vehicle is fully charged before a long trip.
However, when this feature is enabled and you try to charge your Tesla outside of the scheduled charging period, it causes the Tesla to show “charge port latch not engaged” error message.
You have two choice:
- Allow it to charge only during the scheduled charging period. In that case, the port latch will engage without any issue as long as it’s within the scheduled time.
- Turn off the scheduled charging period, and the Tesla port latch will engage anytime you plug the charging cable in
Here’s how to turn off the scheduled charging:
- From your Tesla screen, go to “Charging” tab
- Under scheduled charging, turn it off.
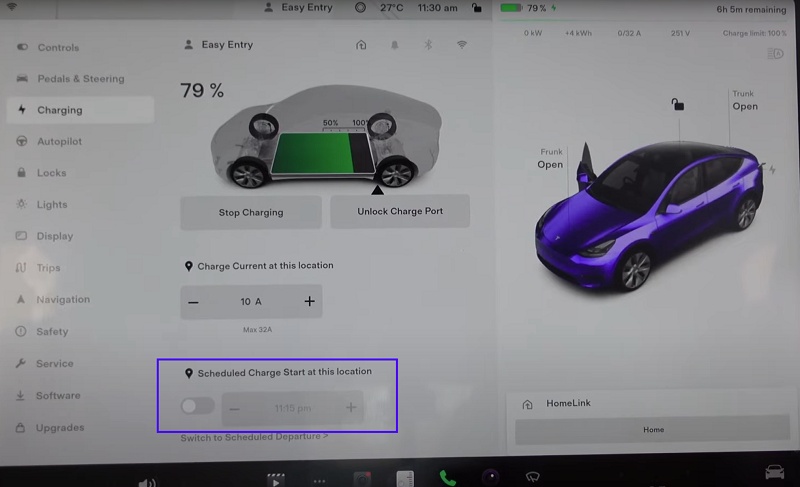
You can also disable the feature from the Tesla mobile app.
Once the feature is disabled, you should no longer see the “Tesla charge port latch not engaged” error message.
5. Update Tesla Software
Another option is to download the latest software update from Tesla.
Software updates can fix known bugs and glitches, including issues with the charging port latch.
To download the latest software update, go to the “Software” section in your Tesla’s settings and select “Check for Updates”.
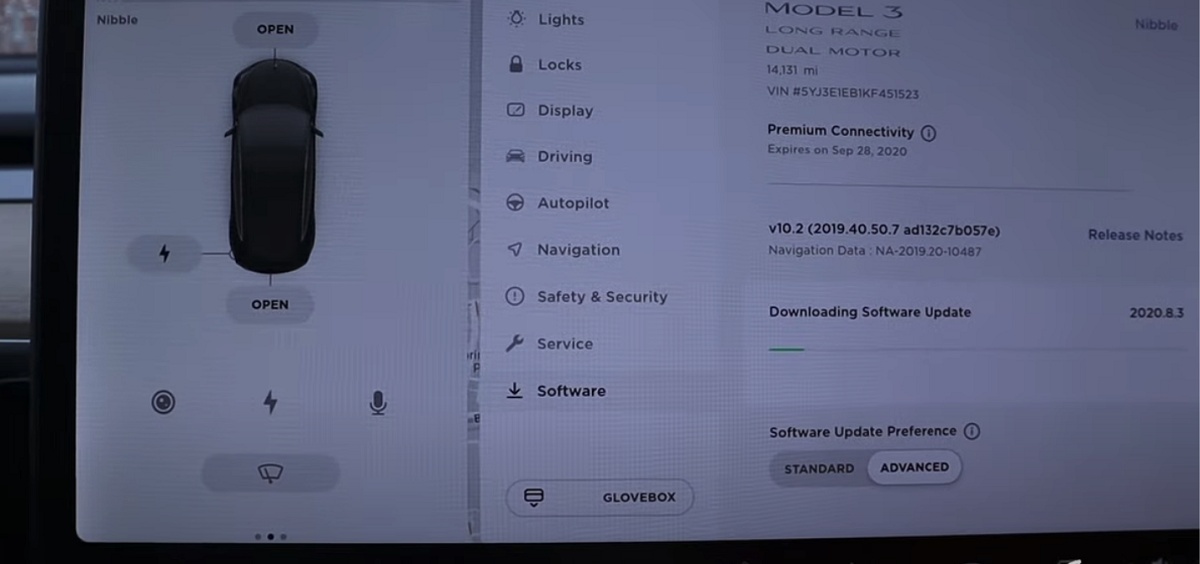
If an update is available, follow the on-screen instructions to download and install it.
6. Fix Issues Caused by Weather
Environmental factors can also play a role in causing the “Charge Port Latch not Engaged” error message to appear on your Tesla.
For example, in cold weather, ice can accumulate around the charge port, preventing the latch from engaging with the connector properly. This can result in reduced charging rates or even prevent charging altogether.
Some Tesla vehicles are equipped with a charge port inlet heater that turns on when you turn on the rear defrost in cold weather conditions.
You can also thaw ice on the charge port latch by enabling preconditioning using the mobile app.
Similarly, high humidity can also cause the charge port latch to malfunction. In such cases, it is recommended to try and dry the charge port area before attempting to charge your vehicle.
You can use a dry cloth or towel to wipe down the charge port area and remove any moisture that may be present.
In addition, extreme heat can also cause the charging speed to be reduced. This is because the battery and the charging system can become overheated, which can lead to a reduction in the charging rate.
To avoid this, it is recommended to park your Tesla in a shaded area or garage during hot weather.
Overall, it is important to be aware of the environmental factors that can affect your Tesla’s charging process and take appropriate measures to address them.
7. Contact Tesla Service
By following these troubleshooting steps, you should be able to resolve the “Charge Port Latch Not Engaged” error message on your Tesla vehicle and get back to charging your vehicle.
However, if none of the above steps resolve the issue, then you need to contact Tesla customer support for further assistance.
You can find your nearest service center through Tesla’s website. Alternatively, contact Tesla’s customer support hotline, which is available to address your concerns.
When you do, remember to provide as much detail as possible about the issue, including when it occurs.
They may be able to diagnose and fix the problem remotely or schedule a service appointment for your vehicle.

